2010年10月31日日曜日

My First Quilt


When I was 10 I was quite an unhappy child. My grandfather died suddenly and my mother started to work full-time, from home, admittedly, but it still turned my world upside down. I was a very frail child, constantly ill and frequently off-school. We lived in a very rural area where there were no other children and my school was 2 long bus rides away so I was lonely as well.

But there in the house was Granny Dougall's quilt and also Mary Thomas' Embroidery Book. This had a few pages on making a hexagon quilt by the English papers method. There was also the rag-bag of left over dressmaking scraps. My mother made clothes, reluctantly and not very well, but she did make them.

My father obliged by making me a template from a scrap piece of wood. And my mother was indifferent to my having the freedom of the rag-bag. My mother's translation work arrived every week in large brown envelopes so I had an ample supply of papers. And I got started.

It took me about a year to hand sew the patchwork. We had  an old treadle sewing machine and I already made some of my clothes, but Mary Thomas didn't mention using a machine so I didn't know you could.


When it was finished I was allowed to buy the backing. I didn't know about using cotton fabrics for patchwork. By chance, I expect most of the dress fabric remains that I used would have been cotton at that time. The only fabric cheap enough was a rather slippery nylon, so that is what I backed my quilt with.

Then I felt that the flowers didn't stand out enough. I didn't know anything about quilting, and anyway I'm sure no shop where we lived would ever have heard of quilting wadding.

So I spent another year feather stitching round each flower.

When I got it out of the cupboard to photograph last week, and looked at it again, I thought I really had done a surprisingly good job, given my age, my resources, and the fact that I had no help to turn to for advice.

And it's fun seeing my grey striped school summer uniform, and my mother's dark green best dress, and the green striped fabric I made a dress from that I was very proud of, and all the others, each with a memory attached.

.


2010年10月30日土曜日

Japanese calligraphy


This is my husband's latest big piece of Japanese calligraphy.The piece is huge, you can tell the scale from the pair of slippers in the top photo, and even then we haven't quite managed to get the top of the piece in the photo. It was too big to photograph easily. It was in an exhibition in China earlier this month and won a prize. Now he's working on the even bigger piece he's planning to submit to next year's exhibition.


2010年10月29日金曜日

Grey Day


It is one of those really dark, grey days. The heavy dark cloud seems to be sitting almost on the roof tops. And it is mild but most uncomfortably damp. One of those days when, if you put the heating on it is too hot, but without it the room is chilly.

For days like this I take photos in the summer in my garden. This one is some kind of Gazania, I think. I am dreadful at remembering the names of my plants. I choose them for colour, size and flowering time, so the name tends not to stick!

But doesn't it make a grey day feel brighter just to look at it!


2010年10月28日木曜日

Dolls House Bride


I have a seriously overcrowded dolls house because, although most people seem to go for dolls houses with rooms full of furniture and  just a few dolls, I found that what I loved was making the dolls. Sadly my eyesight is now too bad to make any more, but it is probably just as well as the dolls house is full to capacity!

I made the dolls house myself from a kit supplied, probably in the late 1990s by a firm in, I think, York, whose name I can no longer remember. It was perfect for my tiny flat as it has such a small footprint.


As I am keen lace knitter you may not be surprised that this was the first doll that I made! The pattern was in one of the dolls house magazines, of which there were quite a number in the 1990s. I had a look this morning to see if I could find the pattern, but I just couldn't find it, so I can't provide any more information about it than that. I remember knitting it on tiny needles, using au ver a soie thread.  It was intended as a wedding dress and I think it was part of a wedding issue of the magazine, but I made it in ecru. After all white wedding dresses are a relatively recent idea.


I still remember how much fun it was to knit.


2010年10月27日水曜日

Granny Dougall's Quilt


When I was a child my grandmother and mother could both knit and sew, but regarded it as a chore. Neither of them enjoyed it or was particularly good at it.


But in our house we had one thing that was old and beautiful, Granny Dougall's quilt. She was not my grandmother, but my grandfather's grandmother.  Her son, who was headmaster of a school at Melrose in the Scottish borders, married twice and both wives had large families, many of whom survived. My grandfather was one of the second wife's children. One of his half brothers was a cabin boy on his first voyage, unfortunately that first voyage was on the last wooden sailing ship (presumably the last on  a regular commercial run) to go down going round the Horn, when he drowned.

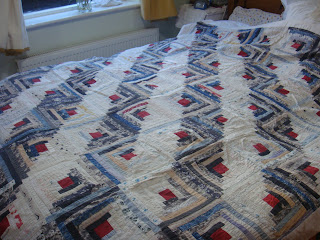
Anyway to get back to Granny Dougall. As an elderly widow she lived with her son and his large family. In her 80s her main occupation was the creation of much-needed bedding for everyone. She used the scraps of fabric left over from clothing the family. All clothing was made at home and must have been a huge task. I only ever saw this example of her work. My grandmother burnt the rest! But I know that many of them were made of woollen fabrics. This one is cottons, mostly, I believe, shirt fabrics.

The strips are sewn to a fabric backing which was no doubt also left over from something. They are really narrow, to make the maximum use of even small scraps of fabric. It is all hand stitched, with tiny, even stitches. I wonder how she had the eyesight to do it so neatly in her old age and before electric light!

It is by no means pristine. This is a quilt that has had a long and useful life. There's lots of mending, some of the later mends done with a sewing machine. Pieces of fabric have been stitched in over the top of badly worn-out ones. And the outer binding, in red to match the centres of the blocks wore so badly that an old sheet had been added as a backing and brought up over the borders, covering them.

It's not the sort of thing any museum or collector would want, but I've loved it since I was a child, and knowing my mother to be a thrower-out in her mother's tradition, I made very sure I purloined it when I left home!

Here is a close-up to show some of the old fabrics.


She may have been 'just' an old lady living in her son's house and trying in some sense to pay for her keep by sewing household linens. But what an artist she was! She died sometime in the later 1800s long before I was born, but she has been an inspiration to me all my life. When I sit there making something I feel as if she were right behind me, at my shoulder.

And that's why I started, at the age of 10, with only Mary Thomas's Embroidery book and my mother's rag-bag, to make my first quilt. More about that another time!


2010年10月26日火曜日

Knitting Basket


For years I was frustrated that knitting bags designed for the purpose were too small (I knit an awful lot!) and generally fell over at inconvenient moments into the bargain. Then I found the perfect (for me) solution! This is a shopping basket I bought some years ago from Lakeland. Being intended as a shopping bag it had a plastic waterproof lining which I stripped out.


Instead I made a lining for it from a remnant of green shot silk. The lining has a drawstring top.


And here are the contents! I keep my pattern of the moment in a clear plastic file with any spare needles I will need. The spare yarn goes in a clear plastic bag at the bottom of the basket and each project, I'm always making several things at once, goes in a separate plastic bag.


Then there is the spare pair of reading glasses, so I don't have to search for them at crucial moments and the Susan Bates peg board row counter, which I couldn't live without.


The notions and tools fit into one of those old fashioned purses I remember from my childhood, a purse within a purse. This holds a pair of scissors, a clear plastic pack of stitch markers, safety pins and one of the little leather thimbles I make for myself. Then there is a piece of heavy duty interfacing with needles and pins. To the left of the purse you can see my latest tatting project and its bag. I photocopy the pattern I am working at the moment to save lugging the book around. Then there is another set of needles and pins, a fine crochet hook and a pair of scissors.


2010年10月24日日曜日

Estonian shawl

I was very taken with Miranda's Triangular Shawl from Knitting Lace of Estonia by Nancy Bush. But I don't much like triangular shawls. I prefer square ones. Also the shawl was too small for what I wanted to make. And it was knitted in the traditional Estonian way of casting on and knitting from the edging upwards. I prefer to knit on edgings afterwards, (I just prefer the way they look when done that way.) And, where possible, I prefer to knit from the centre outwards, it is easier to know how large the shawl will be when finished.

This sounds like a lot of changes, but it really is not difficult to alter a pattern.

To start with, I looked at the charts carefully to see if any elements would cause problems if worked upside down. In this case I couldn't see any lurking difficulties.

I began with a normal centre for a square, working the centre stitch pattern as shown in the book, but increasing for the square instead of decreasing. This stitch is very easy to work this way. I went on until I had my desired size of centre.

The narrow band between sections was no problem. I just counted my stitches in each section and positioned the pattern accordingly.

 With the diamond section I marked the centre of each of my sections and then marked the pattern repeats outwards from the centre. Again that gave me my pattern position.

Having worked another narrow band I was still short of my ideal size, so I looked at the edging pattern and came to the conclusion that most of the edge shaping came from blocking rather than the pattern itself. So I knitted the edging. I do actually find that the pattern does impart a slight wave to the outer edge, but it doesn't show enough to matter in wear.

I worked another narrow band and then knitted on a simple edging all round.

I blocked my shawl and it is the one I probably throw on most often when I'm a bit chilly. I particularly like the textured centre stitch pattern.

For anyone who hasn't yet got hold of Nancy Bush's book, I can thoroughly recomend it. There are lots of varied patterns with lovely clear charts. I have several more patterns in it that I am eyeing with an eye to the future!

2010年10月23日土曜日

Queen Susan Shawl


This is a Ravelry pattern. The 'original' was an old photograph in the archive of the museum on Shetland. A group of clever people on Ravelry got together and worked out the pattern from that old photograph. They published the pattern on Ravelry for those of us whose knitting skills greatly exceed our computer skills to enjoy.

I fell in love with this pattern and just had to knit it, but I didn't need yet another white cobweb weight shawl. What I needed was a big warm shawl I could wrap myself up in on cold days. And that means at least one cat on my lap, probably kneeding away happily. The shawl had to be considerably more robust than the dainty original, and if it was quite a bit bigger, more like a blanket than a shawl, that was going to be all to the good. So I opted for a yarn that was nearer to a laceweight than a cobweb weight. And since a white comfort blanket is really not a good idea with muddy paws around, I looked at my stash and chose a blue 100% cashmere industrial oiled yarn. I wasn't at all sure I would have enough for the whole thing, especially as I made the centre a more generous width than suggested, but I  thought a different yarn for the border would be just fine so I wasn't worried about that. I got so carried away with knitting this that I abandoned all my other projects to concentrate on this one. Having strong views on what I like in an edging, I used my own, and in a surprisingly short time I was finished. Blocking was a problem as my usual arrangements just weren't big enough and in the end I had to block it folded in four. It took longer to dry and the results aren't perfect, but the charcoal grey yarn is 50% silk and 50% cashmere so the silk helped it to fall into place.

It is warm, soft and comfortable. And it has stood up to my cats! The moral of which, I guess, is that just because a pattern you like  doesn't produce the result you want doesn't mean you can't play around with it until it does!

Tatted Doilies


Here are just a few of the tatted doilies I make. There are so many books with good tatted doily patterns available nowadays that I am spoilt for choice. The square one that Ginger is helping to model is one of Mary Konior's lovely designs. The others are mostly Japanese patterns. The Japanese are particularly fond of doilies and their books are easy to follow for any intermediate tatter even without being able to read the text. (Being bilingual in English and Japanese I actually can read the text, but the Japanese are very diagram orientated so there is very little in the text and what there is is not critical.) The square purple mat is my own pattern.

For those who ask, "But what do you do with doilies once you have made them?" I lay them on shelves next to each other, sort of like shelf lining. They look very good like that. I also give them away. They make very good presents, especially if you remember to explain that they are tougher than they look, mine stand up to the worst my cats can do to them, and are easy to wash. I do pin mine out to block them, at least the first time, but after that I just pull them into shape and iron them.

Tatting is the easiest care of all the laces, at least I have always thought so!

2010年10月22日金曜日

Helping Paws!

I decided to take a whole lot of photos of my various creations yesterday, but Ginger had other ideas. As far as he is concerned, the only reason I could possibly have for getting the camera out is to take photos of him. So here he is, giving my work his seal of approval.

And after that it seemed only polite to give Tigger his turn, even if he wasn't totally delighted at being woken up!


2010年10月21日木曜日

Autumn colours

This year's autumn colours are a bit disappointing here.
We had a lot of rain and then unusually warm weather so a lot of the leaves fell before the cold weather started.
So here is a glimpse of last year's view from my windows.


And just to remind you that it's getting cold, it was 0 degrees C all night last night, here are some nice warm hot water bottles I knitted recently.


2010年10月18日月曜日

Fingerless Mittens

These mittens are quick and easy to make using 4ply sock yarn, which comes in a wonderful range of exciting colours.
They fit a small to medium adult hand.
They are made on 2 needles so are within the capabilities of  inexperienced knitters.

2.5mm needles.
Cast on 60 sts.
Work in K1P1 Rib for 5-6cm.
Then change to stocking stitch, (knit 1 row, purl one row, alternately).
On the right side row place markers after the 26th and 30th stitches for the first mitt or after the 30th and 34th stitches for the second mitt.
 On the 3rd row and following 4th rows knit to the marker, after the marker increase in the first and last stitches between the markers, work to the end. Continue like this until you have 20sts between the markers. Work 3 rows straight.
On the next (right side) row work to the second marker, remove the 2nd marker, cast on 4 sts, TURN, work back to the first marker, remove the marker, TURN. You are now working on 24 sts only for the thumb.
On these thumb sts work in K1P1 rib for 4 rows. Cast off (not too tight).
Return to hand stitches. Join the yarn to where your first marker was. Cast on 4 sts. Work to the end of the row. Cont in st st work 18 rows.
Change to K1P1 rib and work 4 rows.
Cast off.
Sew the thumb cast on to the hand cast on and sew up the side of the thumb. Sew the side seam.

A DK version can be made using 4mm needles and casting on 40 sts.
Divide for the thumb by placing markers after the 20th and 22nd stitches for one mitt and after the 18th and 20th stitches for the other mitt. Inc to 16sts between markers. Add 3 sts instead of 4 for the thumb. And work fewer rows above the thumb (the easiest way to check how much to knit here is to lay the mitt against your own hand.

Naturally a larger version can be made by starting with more stitches. Just remember to place one marker in the middle of your sts and the other marker the appropriate number of stitches before/after that marker for the two mitts.

I understand that these are very popular with the young these days as they leave the fingers free for all that texting etc! And being made of sock yarn they are easilly washable. Good Christmas presents perhaps!

2010年10月16日土曜日

Knitting: Herringbone stitch

I'm very fond of a textured stitch which I always thought of as one of the brioche stitches, but which Mary Thomas called  Rose Fabric variation. Lately I've seen it called herringbone stitch, so I'm not really sure what to call it!

An even number of stitches.
Knit one set-up row.

Pattern
Row 1 *K1, K1below (ie. knit into the stitch below the next stitch instead of into the next stitch itself)*
Row 2 Knit
Row 3 *K1below, K1*
Row 4 Knit

I usually add an extra knit stitch (at least) to each side to keep the edges neat.


This tends to turn up nowadays as a 2 colour pattern, rows 1 and 2 in colour A and rows 3 and 4 in colour B. This is a close-up of a lap quilt in two shades of blue merino wool.

It also works in more than 2 colours.


This is a close-up of a blanket in Twilleys Freedom Spirit 100% Wool. Every Row 1 and 2 is in the same green shade that has been used for the garter stitch edging. Each set of 3 groups of rows 3 and 4 is in a different contrast colour. This is a good way of using up left over yarn.

It also works very well in a single colour.


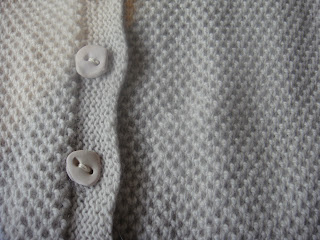
This raglan cardigan is 100% cashmere. The buttons are ones I make from Fimo (I find they wash perfectly).

I use a garter stich hem on the bottom of the body and the outer edge of the collar as I find both points are inclined to lie better that way. The sleeves don't seem to need any edging, but I keep the cuff end of the sleeve fairly tight as I use elbow crutches. For a wider cuff a garter stitch edging might be a good idea. I added elbow patches inside the sleeves (the same stitch but worked on a size smaller needle), and large pockets inside the fronts. I can't easily carry things about because of the elbow crutches, hence the pockets, and they are inside because outside pockets have been known to catch on things. As I have what used to be called a dowager's hump, now called a kyphosis (aren't medical euphemisms wonderful!) I have added short rows to the raglan back above the armholes. Incidentally, as this stitch compresses the work vertically I decrease the raglans every 4th row to the start of the shoulders and only then change to decreasing on alternate rows.

It's a pleasant stitch to work, not difficult, but with enough interest not to be boring. And as you can see (the cardigan shown above is the third I have knitted in this stitch) I love it!

2010年10月14日木曜日

An easy light lunch

I tried an experiment today and it turned out delicious so I thought I would share it. It feeds one but could, I'm sure, be scaled up.

Grease a ramekin or small oven dish. Add a layer of sliced mushrooms. Spoon over enough good quality tomato sauce (for pasta) to cover the mushrooms. Put in a preheated oven at 180 degrees C for 10 minutes.
Then break an egg over the mixture. Top with a generous spoonful of Greek yoghurt. Grind some pepper over it. Pop back in the oven for another 10 minutes.
Serve with pasta (which you have time to cook while the rest is cooking). Quick, light, easy and very tasty!

2010年10月13日水曜日

Tatted brooch


These little brooches are so easy to make, but they look so spectacular! Even a beginner tatter will manage as long as they can make a ring with picots. And those with more experience will find they are useful for using up the thread left on the shuttle after another project.

All you do is to make rings with lots of long (within moderation!) picots. For those with more experience double rows of picots look good, and so do rings worked with two different fine threads held together and used as one. The picots do not need to be identical in size, in fact the result looks better with a bit of variation. Make several rings, not joined to each other but with the bases closely butted. (If beginners can't quite manage this it will still work!) I suggest 5, 7, or 9 rings, it is a matter of what you like the look of and the thread you are using.

Then you need a few basic flower making supplies, stamens (available for sugarcraft flower making), fine florists wire, flower tape. Pliers and wire cutters are useful.

Take 3 stamens and fold them in half. Wrap a piece of fine florists wire around them a bit below the pips so they are held firmly together. Wrap the strip of tatted rings around the stamens and use the thread ends to tie them in place. This forms the centre and petals of the flower. Cut a strip of flower tape in half lengthways (the full width is too much for such little flowers) and wrap it round the stem, stretching it a little as you go, covering the base of the rings and working spirally downwards to form a stem. Flower complete!

For a brooch I usually use two or more tatted flowers with some feathers and some little ready-made flowers (often available from bridal suppliers.) You hold them together, and use more florists tape, winding it on just as you did to form the stem. It is usually easiest to add the ingredients a few at a time, taping each in place.

Sew the finished floral corsage to a brooch back. Trim the stem to a suitable length and use a little more tape to hide the cut stem end and the stitching. Tweek the flowers into place. Finished!

In a future episode I will provide some instructions for more elaborate flowers.

Introduction

I have been knitting for more decades than I care to admit to. I'm particularly keen on lace knitting and textured knits.

I am also a very keen tatter, particularly fond of making doilies of all shapes and sizes. I have two cats, Tigger and Ginger and a small garden.
 I will be talking  about all these topics and sharing photographs of my work, my feline companions and my garden.

I hope I will be able to make it interesting!